Working with DCC Data Refinement Groups
A Data Refinement Group is a way to translate raw IoT or PLC data into human-friendly information. It not only converts numbers and states into symbols, colors, and descriptions, but also allows you to attach metadata such as location and contact information.
The end result is that dashboards can clearly explain and visualize machine states across your fleet, no matter which type of device or PLC is behind the scenes.
Data Refinement Groups can be applied to multiple devices, ensuring uniform visualization even if the raw data sources are very different. For example, a Siemens PLC may call a point T1, while another controller may call it Temp. With a Data Refinement Group, both can map to the same “High Temperature” condition in your dashboard.
This document explains how to configure and apply Data Refinement Groups, along with examples, best practices, and common pitfalls to avoid.
Creating Data Refinement Groups
General Parameters
Name
A descriptive name for the Data Field.
For text fields, this acts as the label for metadata you want to collect, such as contact details, email address, or equipment ID.
Checkbox: Required
When checked, this field must always be filled in when applying the Data Refinement Group to a device.
Typical uses:
- Location → ensures every machine on your dashboard has a known site location.
- Contact Person → ensures operators know who to call if an alarm is raised.
For Sample Point fields, Required means you must match the Data Field to a Collector and Sample Point on the device.
Checkbox: Prefill
Prefill is used to automatically associate static metadata with a machine.
Examples:
- A machine model (if the group is designed for that specific model).
- Automatic mapping to a Collector and Sample Point (avoiding manual setup).
Data Field: Sample Point
The Sample Point is the most commonly used data field. It translates raw data into meaningful information, such as:
- Value ranges with different colors and symbols.
- Alarm states triggered by thresholds.
- Binary masking of PLC inputs.
This allows dashboards to show not just numbers, but meaningful machine states.
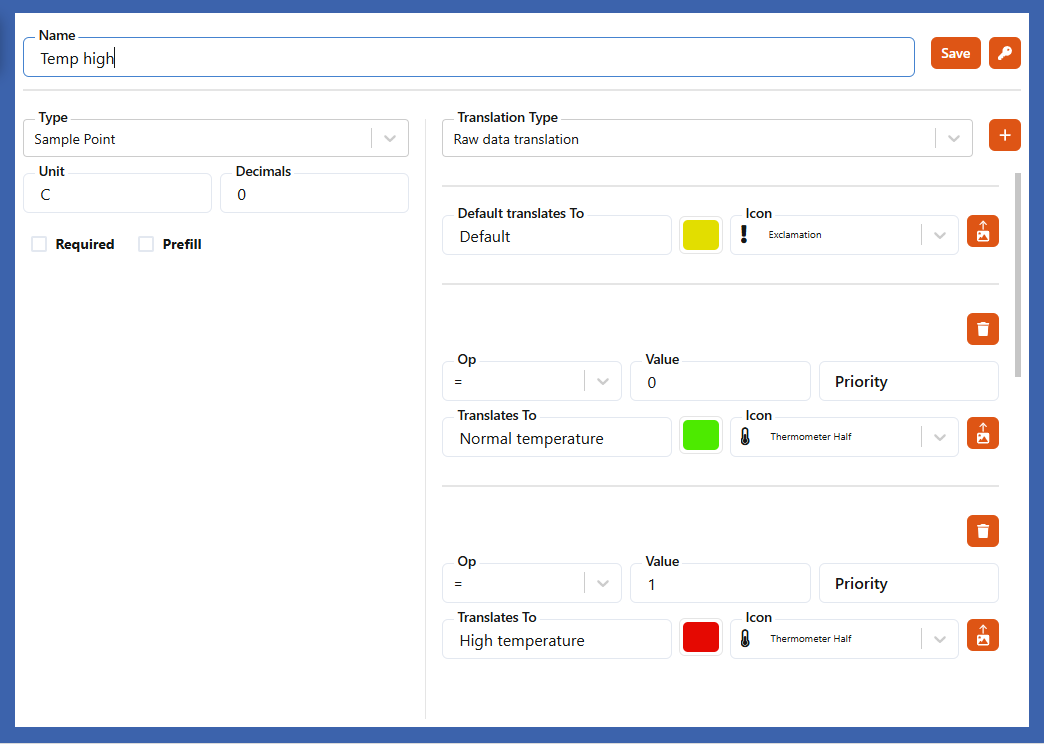
Priority
When multiple conditions are true at the same time, Priority decides which one is displayed.
Example:
- “Medium temp: >70”
- “High temp: >90”
At 100°C, both are true. If “High temp” has priority 0 and “Medium temp” has priority 1, the dashboard shows High temp.
- Lower numbers = higher priority (0 = most important).
- Only positive integers are allowed.
Default Translates To
Specifies what should be displayed when:
- No data is received.
- None of the criteria match.
Example:
- Value = 50
- Criteria = “High temp: >90”
- Result = Default Translation (“Normal” or “No data”).
Also applies if a Binary Masking Translation refers to a non-existing bit index (e.g., requesting bit 34 from a 32-bit value).
Tip:
Always define a sensible default, such as “No data” in yellow, so dashboards clearly show when information is missing.
Translation Type: Raw Data Translation
This is the simplest type of translation.
Example:
- Boolean alarm:
0 = Normal,1 = High Temperature - Default Translation = Yellow “No data” (if device is offline).
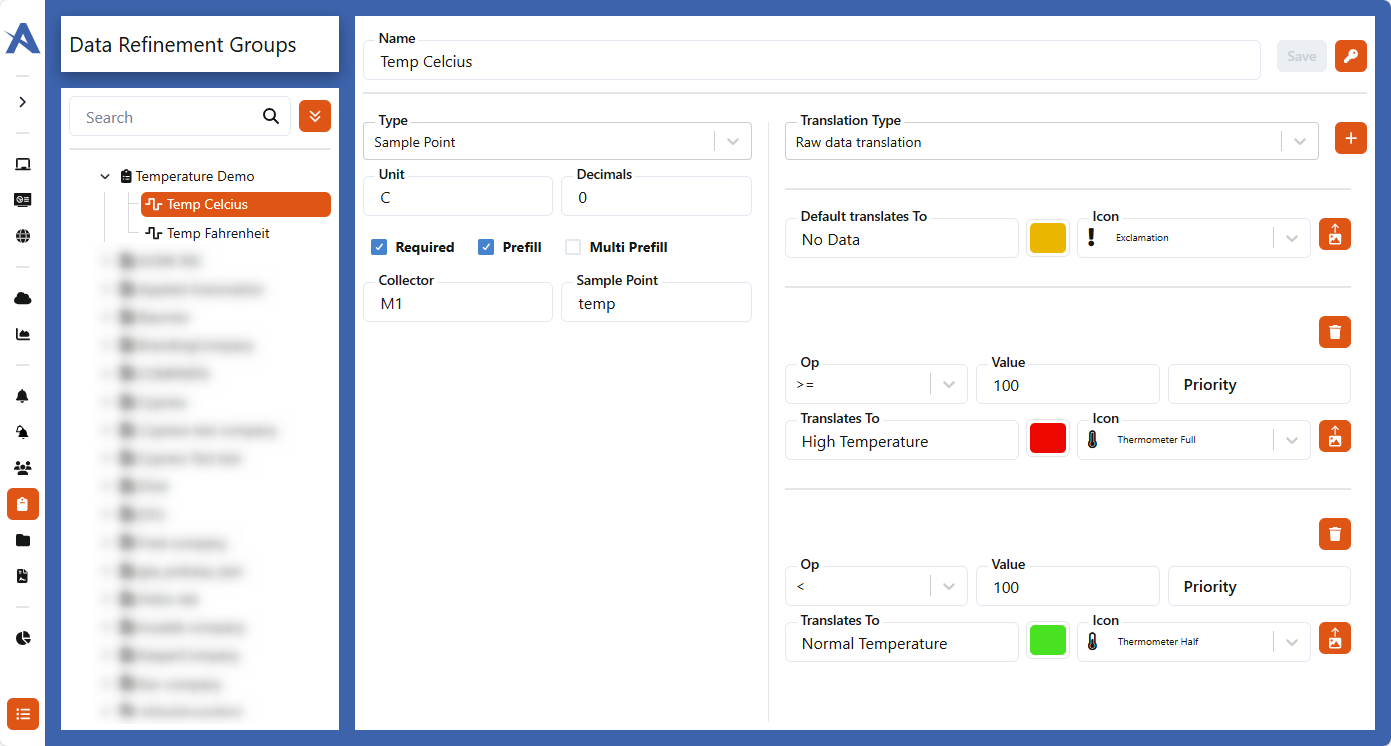
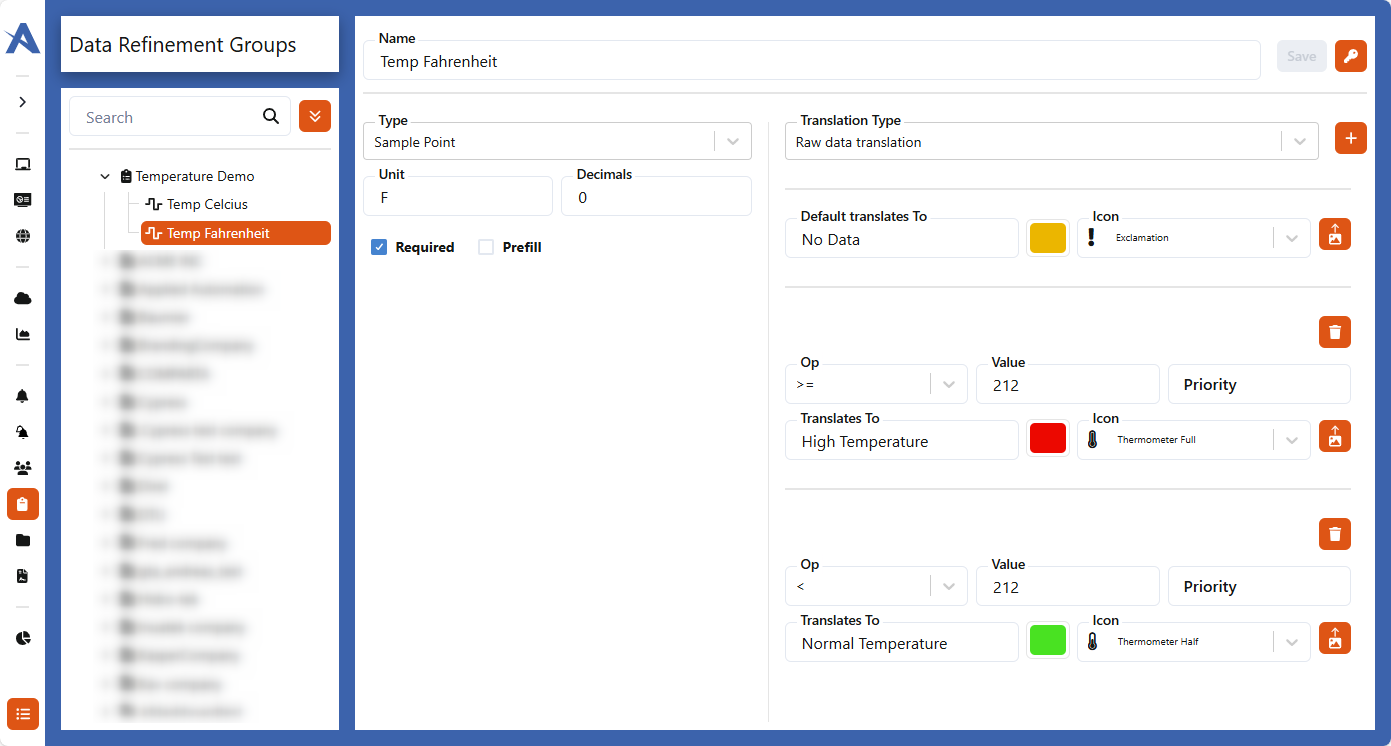
Practical scenario:
Different PLCs may represent temperature differently (Celsius vs Fahrenheit). You can define separate sample points but map both to the same dashboard condition, e.g.:
- Celsius: >100 = High Temperature
- Fahrenheit: >212 = High Temperature
This ensures consistency across devices.
Translation Type: Binary Masking Translation
Used when values are stored as bits in a register.
- The least significant bit (LSB) is 0.
Example:
- Bit index 0 = Emergency Stop
- Bit index 1 = Stopped
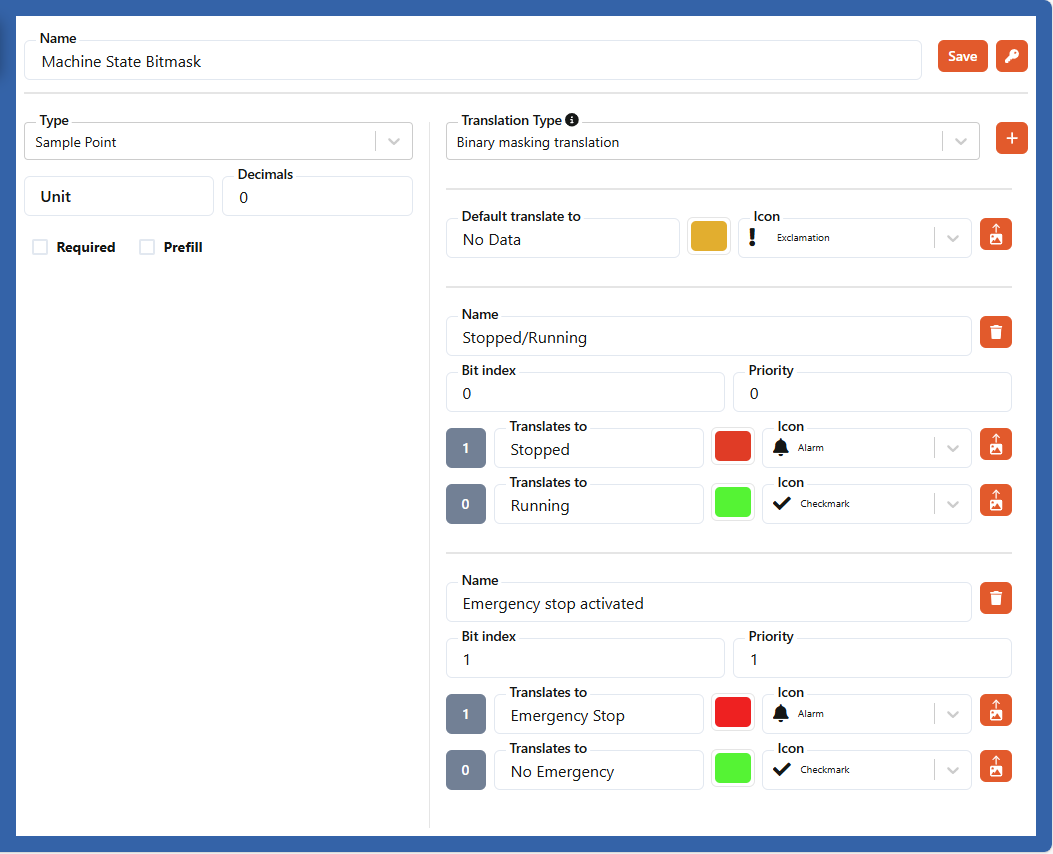
If both are true, the one with the higher priority is shown. If no priority is defined, list order decides.
Best practice:
- Use separate Data Fields if you want to display multiple simultaneous states (e.g., Emergency Stop and Stopped).
- Without this, one condition may hide another critical one.
Data Field: Text
Text fields can be used for:
- Metadata (contact name, phone number, etc.).
- Predefined models or equipment types with symbols, colors, and descriptions.
Example:
UR5 → "Universal Robot UR5"(blue cog)KR16 → "KUKA KR16"(orange cog)
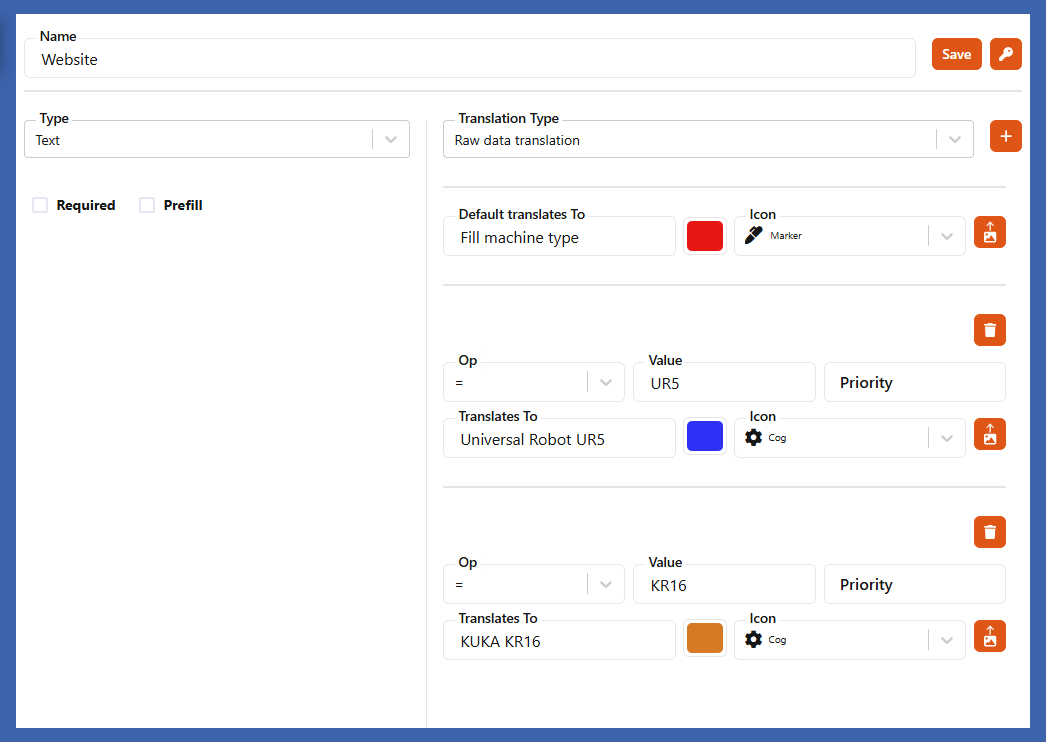
Tip:
Use text translations for categorization (e.g., machine type, fault code descriptions). This makes dashboards much easier to interpret for operators.
Data Field: Number
Similar to Text fields, but supports only numerical values.
Useful for things like machine IDs, fault codes, or production batch numbers.
Data Field: Action
Lets you open dashboards directly from icons:
- From a fleet table.
- From a fleet map (if Use as map action is enabled).
Example:
- Icon: Bar chart
- Opens dashboard:
MachineMainPage - Description: “Machine details”
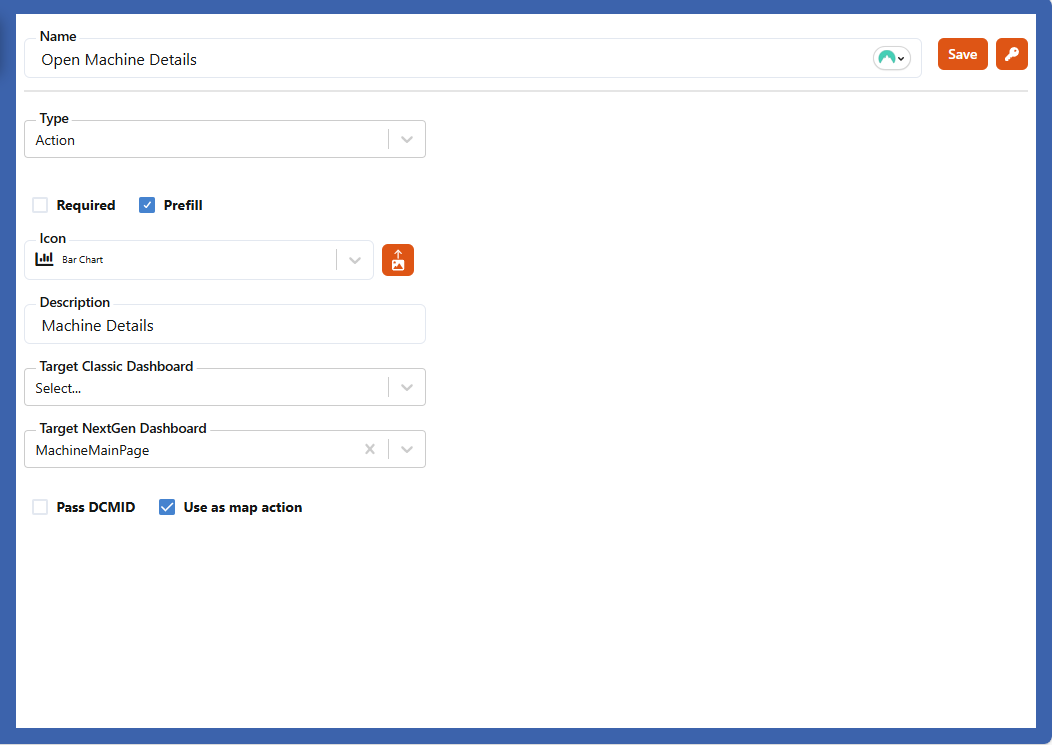
Practical use:
Fleet managers can quickly drill down into a machine’s details by clicking on its icon - saving time during troubleshooting.
Data Field: Location
Defines the device’s GPS/GNSS coordinates.
- If Prefill is checked → the Collector must provide
LatitudeandLongitude. - If uncertain → leave Prefill unchecked and set Required, so the user is prompted to provide coordinates.
Why it matters:
Accurate location metadata enables fleet maps and location-based dashboards, which are especially useful in mobile equipment scenarios.
Applying a Data Refinement Group to a Device
Once your Data Refinement Group is defined, you can apply it to any device:
- Go to IoT Administration.
- Locate the device.
- Click Add → Select Data Refinement Group.
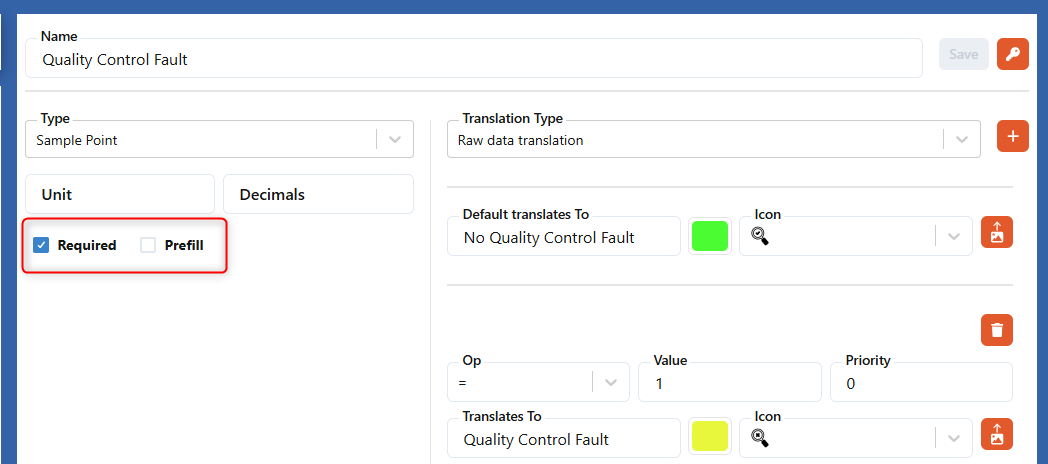
Example Case
- Quality Control Fault = Required + Not Prefilled
→ You must manually select Collectors/Data Points before saving. - Phone = Optional
- Contact Person = Required

The corresponding Data Refinement Group for Quality Control Fault:
Handling Prefilled Data
Sometimes a Data Refinement Group contains prefilled fields that don’t match the device.
Example:
- A Fahrenheit temperature point is defined and prefilled.
- The current device only reports Celsius.
Result:
- The prefilled Fahrenheit field remains inactive.
- Note that you cannot save the group if such a field is marked as Required.


👉 Tip: Always leave optional or incompatible fields as Not Required, so the Data Refinement Group can still be applied.
👉 Reminder: Prefilled fields can still be edited before saving, so you can adapt groups to specific devices.
Summary and Best Practices
- Use Required for critical metadata (e.g., contact, location).
- Use Prefill only if you are confident the field always exists.
- Always define a Default Translation for missing or inactive data.
- Use Priority to ensure the most critical condition is always displayed.
- For binary masking, separate fields may be needed to show multiple states.
- Keep names and descriptions operator-friendly for clarity on dashboards.
By applying these practices, Data Refinement Groups ensure consistent, meaningful, and actionable insights across your fleet - no matter how varied the underlying devices are.