Connecting a Quake QConnect device
Article version 1.0
Prerequisites
- A Quake QConnect device.
- The latest stable version of the QApplication installed on the QConnect device.
- A computer with SSH access to the QConnect device (e.g., via terminal on macOS/Linux or an SSH client like PuTTY on Windows).
- An administrator account on the Inuatek Data Collection Cloud (DCC).
- Read and understood the QApplication documentation from Quake (available upon request from Quake Customer Support: customersupport@quakeglobal.com).
Note: This guide does not cover the technical details of the QApplication. Users are expected to be familiar with its functionality or refer to the documentation as needed.
In the following guide we will show how to set up the Quake QConnect to publish positioning data to the DCC.
1. Create a new QConnect device on the DCC
On the DCC, navigate to the IoT administration page. Right-click on the company or folder, in which the new device should be created:
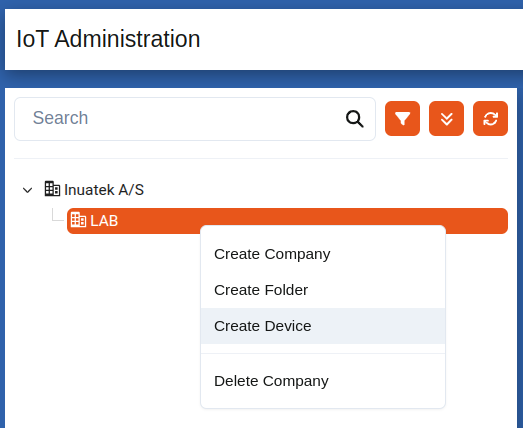
In the dropdown, select Quake QConnect device.
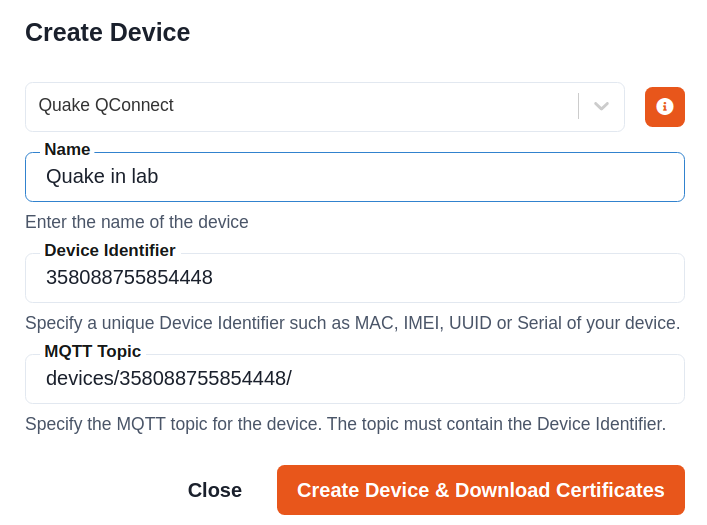
Choose a suitable name for the new device. The Device Identifier should be the UUID/IMEI of the QConnect device which can be found on the physical device. Create the device by clicking the Create Device & download Certificates button. A zip archive will be downloaded to your machine containing client certificates and a QConnect configuration that enables sending GNSS-data (Latitude, Longitude and Altitude).
2. Connect the Quake QConnect Device to the DCC
This section covers:
- Preparing the Quake QConnect device
- Viewing data on the DCC
2.1 Preparing the Quake QConnect Device
Before the QConnect device can establish an MQTT connection to the DCC, you must transfer the downloaded client certificates and the configuration to the device.
Use the scp command to securely copy the certificate- and configuration file(s). Replace the placeholders in the example below with your actual values:
scp -P 22222 -r /path/to/certificates/<device-uuid>/* root@<qconnect-ip>:/root/qconfig/config
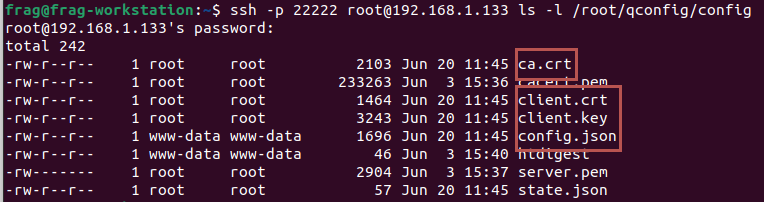
To verify that the client certificates and configuration were successfully transferred, list the contents of the target directory:
ssh -p 22222 root@<qconnect-ip> ls -l /root/qconfig/config
Once the certificates and configuration are transferred, reboot the QConnect using the following command:
ssh -p 22222 root@<qconnect-ip> poweroff
2.3 Viewing data on the DCC
On the DCC, navigate to the Data viewer page. This can be done from the Device status page, or using the menu on the left. On the Data viewer page, select the device and the sample point.

GNSS data is coming through!
3. Manually setup Quake QConnect and IoT-Configuration
This section explains how to manually set up the GNSS configuration on the Quake QConnect device and align it with the DCC IoT configuration. This process will help you understand how the QConnect and DCC interact, which is useful if you plan to extend the configuration later.
Make sure to still follow the steps outlined in the Preparing QConnect Device section. However, if you prefer not to transfer the QConnect configuration file, you can manually copy the necessary certificate files using the following command:
scp -P 22222 \
  /path/to/certificates/<device-uuid>/ca.crt \
  /path/to/certificates/<device-uuid>/client.crt \
  /path/to/certificates/<device-uuid>/client.key \
  root@<qconnect-ip>:/root/qconfig/config
3.1 Set Up the QConnect Device via the Web GUI
Access the QConnect Web GUI at:
https://<qconnect-ip>/
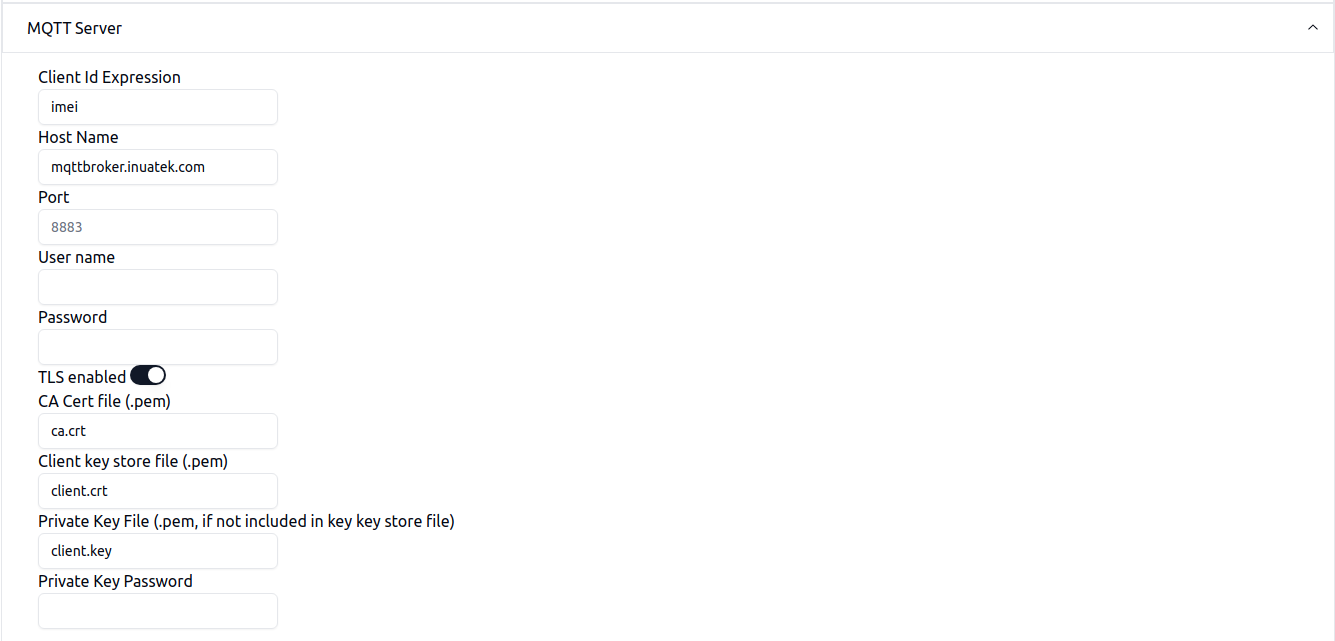
MQTT Server Setup
Navigate to Device Settings > MQTT Server and input the following values:
- Client Id Expression:
imei(fetches the QConnect IMEI number directly) - Host Name:
mqttbroker.inuatek.com - Port:
8883 - TLS Enabled:
true - CA Cert File:
ca.crt - Client Key File:
client.crt - Private Key File:
client.key
Add User-Defined Function
To simplify configuration, use a user-defined function under Device Settings.
- Click Add.
- Name the function (e.g.,
dccsample). - Add the following expression:
{ id: $1, v: str($2), t: int( ($3 || time) * 1000) }
This expression ensures the correct data format is used when sending data to the DCC.

Add Report
- Expand the Reports section and click Add Report.
- Click the edit button on the newly created unnamed report.

- Name the report and set Encoding Method to
json.

Add Trigger
- Click Add Trigger.
- Choose Periodic Trigger.
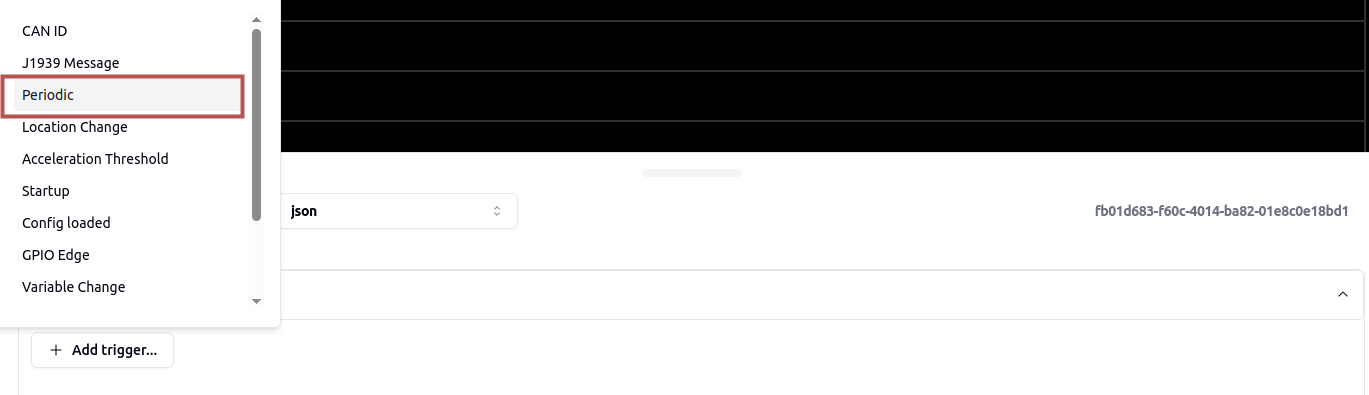
- Set the desired interval (e.g., 15 seconds):

Add Field
Expand the Fields section and click Add Field.
Choose Expression.
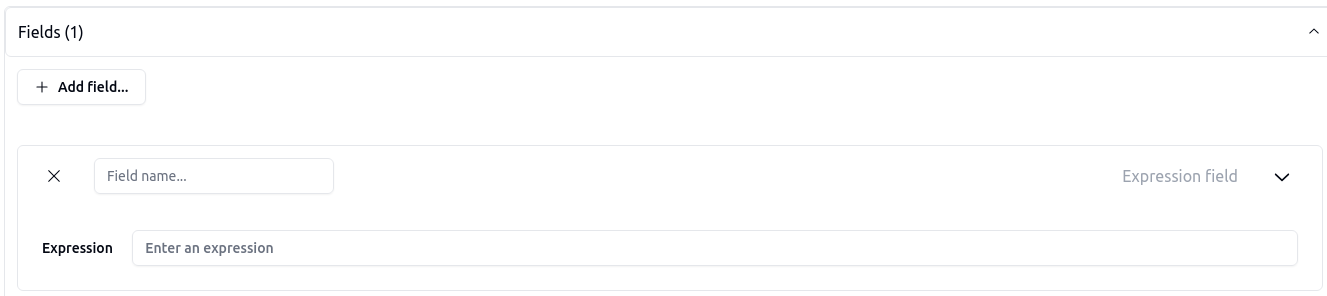
Provide the following:
- Field Name:
data - Expression: use the user-defined function
dccsample, passing in the ID and value.
- Field Name:
Since the DCC requires the following data format:
{
  "data": [
    {
      "id": int,
      "v": string,
      "t": epoch-in-milliseconds
    }
  ]
}
We achieve the above data format by applying the Field Name of data, and then utilizing our User defined function (dccsample), encapsulated by [].

The field now generates the desired format:
{
  "data": [
    {
      "id": 1,
      "v": latitude,
      "t": time
    },
        {
      "id": 2,
      "v": longitude,
      "t": time
    },
        {
      "id": 3,
      "v": altitude,
      "t": time
    }
  ]
}
Add Action
- Go to the Actions section and click Add Action.
- Choose Publish to MQTT.
- Enter the topic defined when the device was created. Leave the remaining fields unchanged.
Note: The {imei} in topic fetches the QConnect IMEI number directly

The QConnect is now set up to push three datapoints (latitude, longitude and altitude) to the DCC. The next step is to update the device's IoT configuration so the DCC can correctly interpret the messages received from the QConnect.
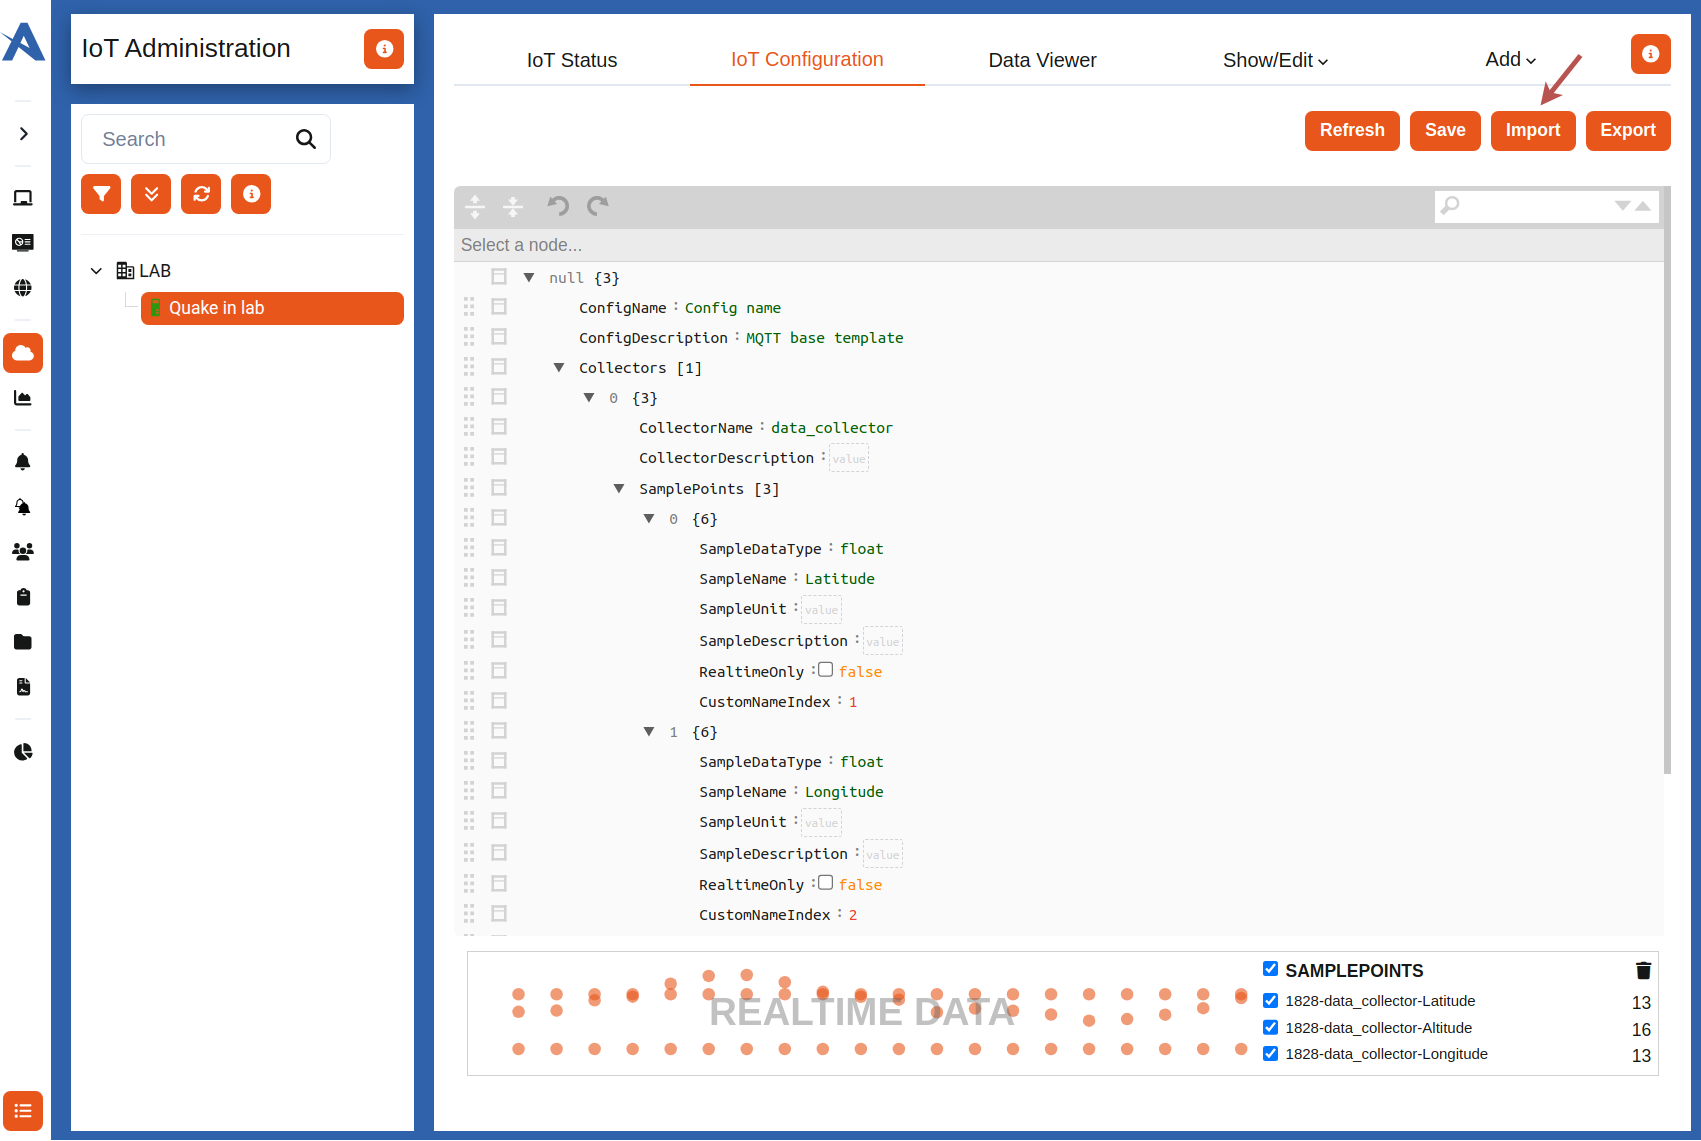
3.2 Updating the DCC IoT configuration
Note: By default, the IoT configuration will be generated using the GNSS example.
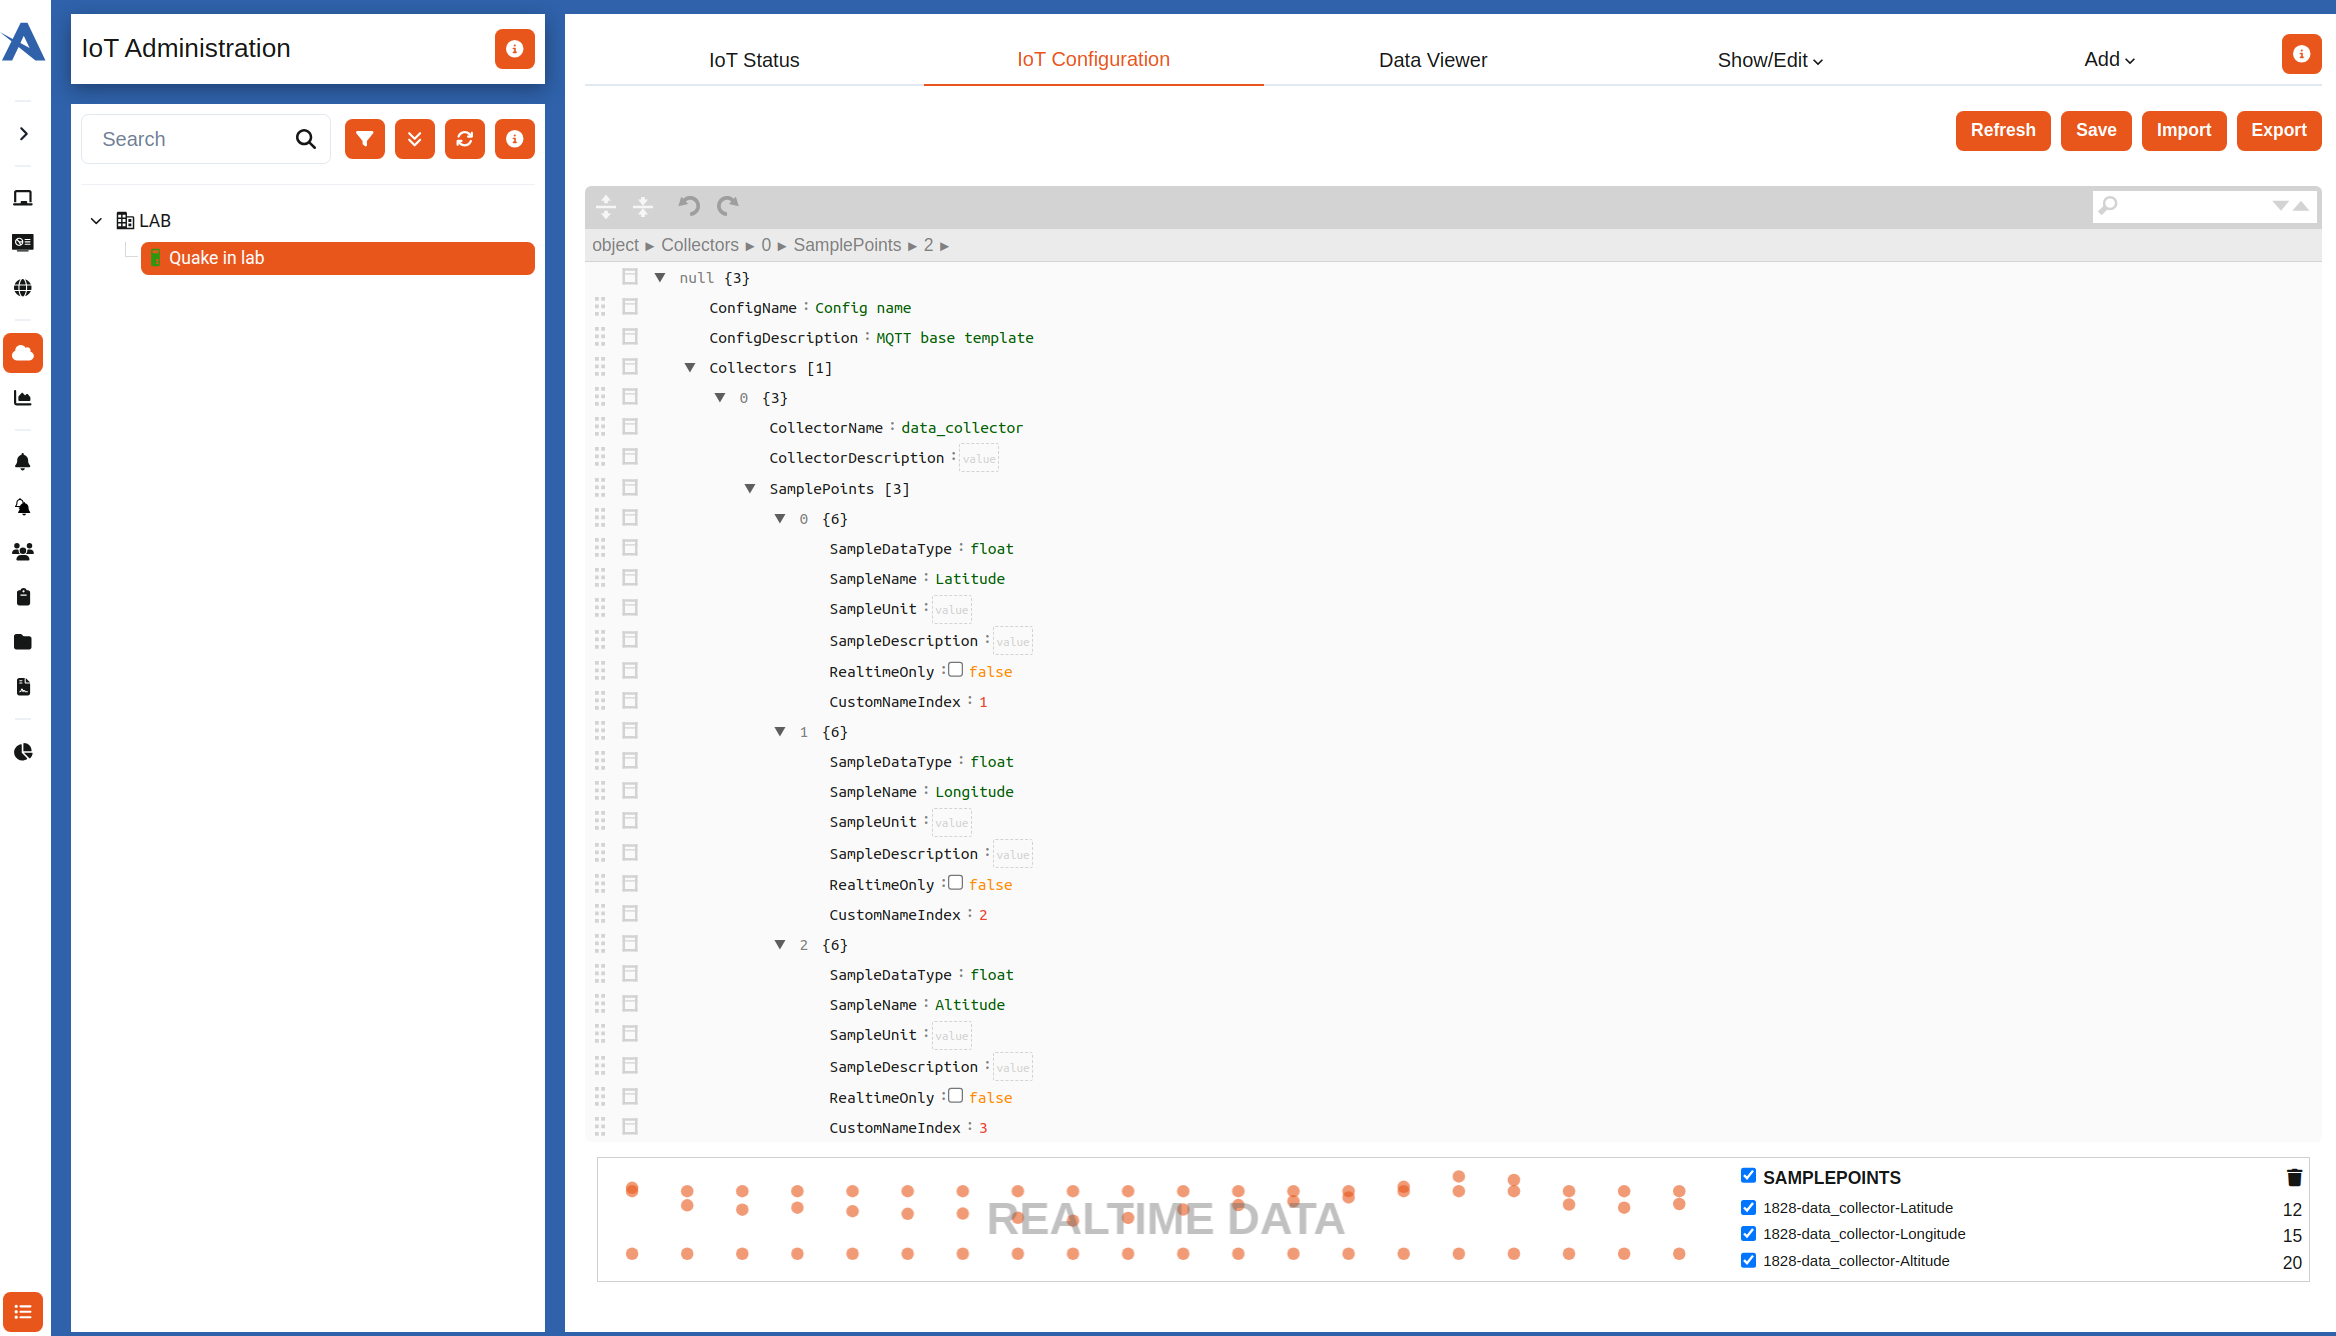
If you have successfully configured the Quake QConnect and uploaded your certificates, the device should be able to connect to the MQTT Broker. Data will not be present in the DCC unless an IoT Configuration has been made, see Creating an IoT Configuration.
For the configuration we made on the QConnect the IoT-configuration for the device would look something like this:
4. Download the guide example
Here you can download the used QApplication and IoT-Configuration and import them directly in the QConnect and IoT-Configuration respectively.
Note: You still need to create and transfer the certificates as written in Create a new QConnect device on the DCC and Preparing QConnect Device.
QApplication: Download QApplication configuration
IoT-Configuration: Download IoT configuration
3.1 Import QApplication
To import a QApplication json file, click Load from file button, and select the json-file you wish to import.

3.1 Import Iot configuration
To import a IoT configuration json file, click Import button and select the json file you wish to import.